

Dallas healthcare is the most competitive vertical we work in. 4,200+ healthcare practices in DFW alone, all bidding on the same Google Ads keywords, all chasing the same insurance-approved patient demographics, all using nearly identical WordPress templates from the same handful of medical website agencies.
Most of them are flying blind. They have Google Analytics installed. Maybe Facebook Pixel. None of them know why patients abandon their appointment-request forms at 70%+ rates. That’s what Microsoft Clarity reveals — for $0/month. This guide walks you through every step of setting it up on your Dallas healthcare practice site, with HIPAA-conscious configurations from day one.
Microsoft Clarity is free, can be set up to mask patient data (HIPAA still requires a signed BAA before any PHI reaches the tool), and reveals exactly where patients abandon your booking forms. Setup takes 15 minutes. Wait 7 days for meaningful data. Then watch 20 session recordings of users who didn’t convert — you’ll find 3-5 critical friction points in your first afternoon of review.
Looking for hands-on help instead of DIY? Skip ahead to our Microsoft Clarity setup for Dallas healthcare.
Verify privacy on the first booking step
Use dummy data to test the path from the clinic page to booking. Inspect recording and consent behavior before collecting any real patient details.
Related reading. Privacy-First CRO: How to Run Behavioral Tracking Without Violating HIPAA or GDPR.
Why Microsoft Clarity for Healthcare Specifically?
Healthcare websites are some of the highest-stakes conversion environments online. A patient researching a Plano cardiologist or Frisco dermatologist isn’t casually browsing — they have an active health concern, they’re actively comparing 3-5 providers, and they’ll convert within 24-72 hours. The provider with the smoothest UX wins. Every friction point on your appointment form costs you a patient — and that patient is worth $2,400-$18,000 in lifetime value depending on your specialty.
Clarity gives you three things no other free tool provides at scale:
- Session recordings at no cost — up to 100,000 sessions per project per day, not a 100/day sample
- Automatic rage click detection — pinpoints broken booking widgets, broken insurance dropdowns, broken time pickers
- Heatmaps for every page — shows you which provider bios get attention vs ignored, which service pages convert vs deflect
HIPAA Compliance: What You Need to Know
This is where most healthcare practices freeze and never install behavioral analytics at all. The good news: Clarity can be configured to keep patient data out of recordings, though configuration alone does not make it HIPAA-compliant. We’ve deployed it on Dallas dermatologists, cardiologists, OB-GYNs, dentists, and specialty practices.
The 3 Rules for a HIPAA-Conscious Clarity Setup
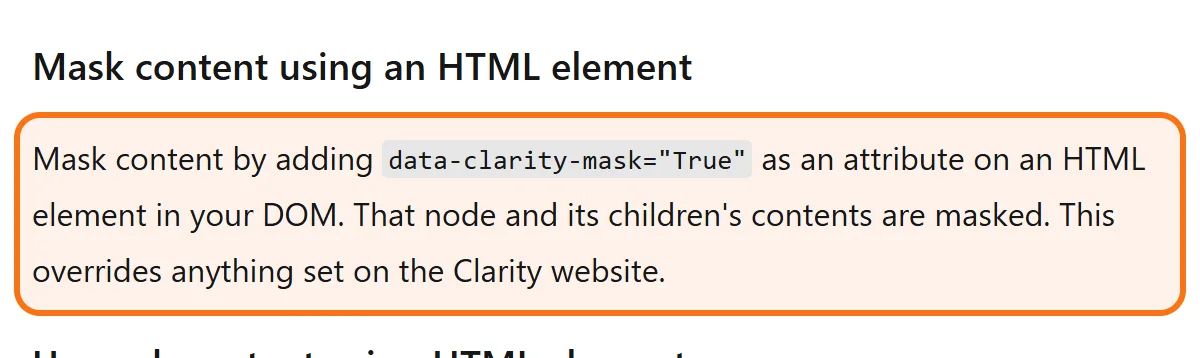
Rule 1: Mask all PHI fields by default. Clarity does this automatically for form inputs, but you must verify it’s working. Add the `data-clarity-mask="True"` attribute to any custom fields containing protected health information (medical history, diagnosis fields, insurance member numbers, date of birth).
Rule 2: Sign a BAA with Microsoft. HHS requires a signed Business Associate Agreement with a tracking vendor before any PHI is disclosed to it. Confirm in writing with Microsoft whether it will sign a BAA for Clarity before going live; without one, keep Clarity off every page where PHI could be entered.
Rule 3: Configure session recording exclusions. In Clarity Settings > Masking, set the masking mode to Strict so the entire content is masked; the mode applies to the whole site, including any pages that display patient-specific data (post-login portals, scheduled appointment confirmations, billing portals). Better: don’t track these pages at all by leaving the Clarity tracking code off them.
If your practice handles ePHI heavily (patient portals, secure messaging), we typically recommend running Clarity only on your marketing site (the public-facing pages where prospective patients land) and excluding patient-portal subdomains entirely. This keeps most of the marketing value and removes the riskiest pages, but not all HIPAA risk: a public page where patients request appointments can still expose PHI to a tracking tool.
Step-by-Step Installation (15 Minutes)
Step 1: Create Your Clarity Account (3 min)
Go to clarity.microsoft.com. Click “Get started.” Sign in with a Microsoft account (or create one with your business email — recommended for ownership clarity if you ever change marketing teams). Click “Add new project.” Enter your practice name, website URL, and industry (select “Healthcare” — this applies relevant privacy defaults).
Step 2: Get Your Tracking Code (1 min)
Clarity will display a JavaScript snippet that looks like: `<script>(function(c,l,a,r,i,t,y){...})(window, document, "clarity", "script", "abc1234567");</script>`. Copy this entire snippet. The unique 10-character ID at the end is your project identifier.
Step 3: Install via Google Tag Manager (Recommended)
This is the cleanest installation method and works for any platform. Open Google Tag Manager. Create a new Custom HTML tag. Paste the Clarity snippet into the HTML box. Set the trigger to “All Pages.” Save and publish your container.
If you don’t have GTM yet, install it first (also free). GTM lets you manage all tracking codes (GA4, Facebook Pixel, Clarity, Google Ads conversion tracking) from a single interface — without touching your website code each time you need to update tracking.
Step 4: Install Directly (WordPress / Wix / Squarespace)
For WordPress: use the “Insert Headers and Footers” plugin. Paste Clarity code into the <head> section. Save. For Wix: Settings > Custom Code > Add Custom Code, paste into <head>, apply to All Pages. For Squarespace: Settings > Advanced > Code Injection > Header, paste, save.
Step 5: Configure HIPAA Settings (5 min)
Return to Clarity dashboard. Click your project. Go to Settings (gear icon). Navigate to Masking. Verify these settings:
- Masking mode: Balanced is the default and masks only numbers and email addresses; choose Strict to mask all content
- Mask by element: Add the CSS selectors of any custom fields that may contain PHI (e.g., `#medical-history`, `#insurance-id`, `#diagnosis`)
- Pages not to record: keep the Clarity tracking code off patient portal URLs, admin areas, login pages
- IP masking: ON (anonymizes visitor IPs)
Step 6: Verify Installation (2 min)
Visit your live website. Open browser DevTools (F12). Go to Network tab. Look for requests to `clarity.ms`. If you see them, Clarity is firing correctly. Return to your Clarity dashboard. Within 5 minutes, you should see your visit appear in Recordings.
What to Do in Your First Week
Day 1-3: Let It Collect Data
Resist the urge to log in daily. Clarity needs at least 100-200 sessions for meaningful patterns to emerge. For most Dallas healthcare practices doing 1,500-5,000 monthly sessions, that’s 3-5 days of data.
Day 4: Review Your Dashboard
Log in. The dashboard shows: total sessions, recordings available, top pages, rage click count, dead click count, and quick back count. Note the rage click number — this is your most actionable metric.
Day 5: Watch 10 Rage Click Sessions
Filter Recordings to “Rage clicks.” Sort by date descending. Watch the first 10 at 2x speed. Note: which page, which element, what was the patient trying to do. Within 10 sessions you’ll identify 2-4 specific UI elements causing rage clicks — usually broken time pickers, broken insurance dropdowns, or hidden submit buttons.
Day 6: Watch 10 “Quick Back” Sessions
Quick back = patient opened a page and returned to the previous one faster than Clarity’s time threshold for that page. This usually means: ad/landing page mismatch, slow load, or the patient immediately saw something disqualifying (wrong insurance, wrong location, wrong specialty). Watch 10. Look for patterns.
Day 7: Build Your Fix List
By end of week 1 you’ll have 5-10 documented friction points. Rank by frequency. The top 3 typically account for 60-75% of total friction. Fix those three this month. Repeat the analysis next month.
| What you see | Likely cause | What to do |
|---|---|---|
| Rage clicks on the booking form | A broken time picker, a broken insurance dropdown or a hidden submit button | Note the page and the element, then put it on the fix list |
| Quick backs: the patient opens a page and quickly goes back | The ad and the page do not match, the page loads slowly, or the insurance, location or specialty is wrong | Watch 10 of these sessions and look for the pattern |
| Bookings stall on iPhones | An insurance dropdown that breaks on Safari iOS, or a Submit button hidden behind the keyboard | Have a developer fix the form on mobile first |
| Patients stop at the date field | A date picker that wants a typed MM/DD/YYYY format the phone keyboard cannot easily produce | Have a developer fix the date picker |
| Taps on Locations or Driving directions before Book Appointment | Patients check the distance first, and location details sit several menu clicks deep | Make location information easy to reach |
| Visitors leave before starting the form | Insurance information is buried below the fold | Show accepted insurance near the top of the page |
Each row is a pattern described in this guide. Rank what you find by how often it happens and fix the top three first.
- The 3 Rules for a HIPAA-Conscious Clarity Setup
- Step 1: Create Your Clarity Account (3 min)
- Step 2: Get Your Tracking Code (1 min)
- Step 3: Install via Google Tag Manager (Recommended)
Dallas healthcare patients have specific behavioral patterns that other markets don’t share. Insurance verification is the #1 conversion friction point on DFW healthcare sites — patients want to know “do you accept my insurance?” before doing anything else. Practices that bury insurance information below the fold lose 40-60% of qualified traffic immediately.
Geographic dispersion matters too. DFW spans 9,286 square miles. A patient in Frisco won’t drive to a Mesquite cardiologist for routine appointments, no matter how good the website is. Heatmaps consistently show patients tap “Locations” or “Driving directions” before tapping “Book Appointment” — yet most Dallas healthcare sites bury location data three menu clicks deep.
Mobile traffic for healthcare is 71-78% in DFW (higher than national average due to commuter demographics). Yet most healthcare websites are still desktop-first WordPress templates that fail at mobile-first patient flows. Clarity makes the mobile friction obvious in your first week of data.
Worked Example: What a Clarity Audit Finds on a Practice Site
Consider a hypothetical dermatology practice with 3 locations across Plano, Frisco, and Uptown Dallas. Suppose it spends $6,400/month on Google Ads and gets 189 monthly appointment requests, has hit a plateau, and can’t figure out why. The figures below are illustrative.
Install Microsoft Clarity on the site (HIPAA-conscious configuration). Within a week of watching 50 session recordings, an audit like this commonly identifies friction points of this kind: (1) Insurance dropdown broken on Safari iOS — affecting nearly half of mobile traffic. (2) Date picker requiring typed MM/DD/YYYY format that the mobile keyboard can’t produce easily. (3) “Submit” button hidden behind the iOS keyboard. (4) Location selector with three different Plano addresses confusingly labeled.
A few developer days fix everything. In this scenario, form completions rise from 189 to 521 a month on essentially the same form starts — same ad spend, hundreds of additional patient requests per month, which at an average new patient LTV is a substantial monthly revenue figure.
Frequently Asked Questions
Only with the right safeguards. HHS requires a signed Business Associate Agreement (BAA) with a tracking vendor before any PHI is disclosed to it, so confirm in writing whether Microsoft will sign one for Clarity. Masking (input boxes are always masked) and keeping the tracking code off patient-portal areas limit what Clarity can capture, but tracking on a page where patients schedule appointments may still have access to PHI. It is designed to be verified by the practice’s own privacy officer before go-live. The critical step: have a signed BAA in place, or keep Clarity off every page where PHI could be entered, before going live.
Minimal impact. Clarity loads asynchronously after page render — typical impact is under 50ms on first paint, with zero impact on Largest Contentful Paint (LCP). Google’s Core Web Vitals scores remain unaffected on the dozens of Dallas healthcare sites we’ve installed Clarity on. The performance impact is significantly lower than tools like Hotjar (~100-200ms) or older session recording platforms.
Clarity runs in the background, but you do need to tell visitors: Microsoft’s FAQ says site owners must inform users of the cookie Clarity uses. So update your Privacy Policy to disclose the use of behavioral analytics in every case, and check any stricter state privacy laws that apply to your patients. We provide template language for Dallas healthcare clients. Note: Clarity never records actual form input values — all field contents are masked by default.
Completely different tools. Google Analytics 4 tells you what happened (1,000 visitors, 200 form starts, 47 form completions). Clarity tells you why things happened (you can watch the 153 patients who started but didn’t complete the form — and see exactly where each one gave up). They’re complementary, not competitive. Most Dallas healthcare practices we work with use both: GA4 for aggregate metrics and reporting, Clarity for behavioral diagnosis.
Want Microsoft Clarity properly installed on your Dallas healthcare site?
Free 60-minute setup session. We’ll install Microsoft Clarity with a HIPAA-conscious configuration on your practice site, walk through the dashboard, identify the 3 highest-priority friction points, and provide your team a prioritized fix list — all in under an hour.
Get a Free Privacy Setup ReviewCall (346) 244-8617Book a free 30-minute call
Dallas, Texas · no obligation · you speak to Mantas, not a sales desk


